DEST configuration and build
In the following we will provide an example on how to configure and build DEST on a local/remote machine.
DEST on ARCHER2

After being successfully logged into the cluster, first export the following and load modules:
export CRAY_ADD_RPATH=yes
module swap PrgEnv-cray PrgEnv-gnu
module load cray-fftw
module load cmake/3.21.3
Custom Environments
Regardless of the existing python environment on the HPC/local system, you need to setup a custom Python environment including packages that are not in the central installation, the simplest approach here would be the installation of Miniconda locally in your own directories.
Installing Miniconda

First, you should download Miniconda (links to the various miniconda versions on the Miniconda website: https://docs.conda.io/en/latest/miniconda.html)
Note
If you wish to use Python on the Archer2’s compute nodes then you must install Miniconda in your /work directories as these are the only ones visible on the compute nodes.
Once you have downloaded the installer, you can run it. For example:
user@login*:~> bash Miniconda3-latest-Linux-x86_64.sh
After you have installed Miniconda and setup your environment to access it, after that you can install whatever packages you wish using the conda install … command. For example create the following environment:
(base)user@login*:~> conda create -n py3_32
(base)user@login*:~> conda activate py3_32
(py3_32)user@login*:~> conda config --env --set subdir linux-32
(py3_32)user@login*:~> conda install python=3 gxx_linux-32
(py3_32)user@login*:~> conda install -c conda-forge ninja
Enter the work directory (/work) and clone the DEST code into a folder, e.g. DEST-master
cd work/e723/e723/yours
git clone https://gitlab.DEST_master
- After the code is cloned, enter the DEST folder, make a build directory and enter it
cd DEST-master
cd BIN
From within the build directory, run the configure command (with updated path!). Note the use of CC and CXX to select the special ARCHER-specific compilers (py3_32 environment).
cmake -G "Ninja" -DCMAKE_BUILD_TYPE:STRING="Debug" -DCMAKE_INSTALL_PREFIX:PATH="/mnt/lustre/a2fs-work2/work/e723/e723/kevinb/DEST-master/src/install" -DCMAKE_C_COMPILER="/mnt/lustre/a2fs-work2/work/e723/e723/kevinb/miniconda3/envs/P32/bin/i686-conda_cos6-linux-gnu-cc" -DCMAKE_CXX_COMPILER="/mnt/lustre/a2fs-work2/work/e723/e723/kevinb/miniconda3/envs/P32/bin/i686-conda_cos6-linux-gnu-c++" /mnt/lustre/a2fs-work2/work/e723/e723/kevinb/DEST-master/src/CMakeLists.txt
i686-conda_cos6-linux-gnu-cc and i686-conda_cos6-linux-gnu-c++ are the C and C++ wrappers for the Cray utilities and determined by the Miniconda py3_32 environment. SYSTEM_BLAS_LAPACK is disabled since, by default, we can use the libsci package which contains an optimized version of BLAS and LAPACK and not require any additional arguments to cc.
At this point you can run cmake .. to e.g. disable unnecessary solvers, then run cmake as usual to build the code (with updated path!)
cmake --build /mnt/lustre/a2fs-work2/work/e723/e723/kevinb/DEST-master/src --clean-first --config Debug -- "-v"
Then check the executable file
file DEST_analyser_Debug
- For testing the executable file you can run the following:
./DEST_analyser_Debug -filename ../TESTS/B_013/B_013.dat
DEST on ARC

After being successfully logged into the cluster, first export the following and load modules:
module load CMake/3.23.1-GCCcore-11.3.0
module load Ninja/1.10.2-GCCcore-11.2.0
Method one
Using Miniconda
Custom Environments
Regardless of the existing python environment on the HPC/local system, you need to setup a custom Python environment including packages that are not in the central installation, the simplest approach here would be the installation of Miniconda locally in your own directories.
Installing Miniconda
First, you should download Miniconda (links to the various miniconda versions on the Miniconda website: https://docs.conda.io/en/latest/miniconda.html)
Note
If you wish to use Python on the ARC’s compute nodes then you must install Miniconda in your /work directories as these are the only ones visible on the compute nodes.
Once you have downloaded the installer, you can run it. For example:
user@login*:~> bash Miniconda3-latest-Linux-x86_64.sh
After you have installed Miniconda and setup your environment to access it, after that you can install whatever packages you wish using the conda install … command. For example create the following environment:
(base)user@login*:~> conda create -n py3_32
(base)user@login*:~> conda activate py3_32
(py3_32)user@login*:~> conda config --env --set subdir linux-32
(py3_32)user@login*:~> conda install python=3 gxx_linux-32
Enter your work directory (/data) and clone the DEST code into a folder, e.g. DEST-master
cd /data/engsci-impact-eng-lab/yours
git clone https://gitlab.DEST_master
- After the code is cloned, enter the DEST folder, make a build directory and enter it (cd ../BIN)
cd DEST-master
cd src/BIN
From within the build directory, run the configure command (with updated path!). Note the use of CC and CXX to select the special ARC-specific compilers (py3_32 environment).
cmake -G "Ninja" -DCMAKE_BUILD_TYPE:STRING="Debug" -DCMAKE_INSTALL_PREFIX:PATH="/data/engsci-impact-eng-lab/engs2454/DEST-master_32/src/install" -DCMAKE_C_COMPILER="/data/engsci-impact-eng-lab/engs2454/miniconda3/envs/py3_32/bin/i686-conda_cos6-linux-gnu-cc" -DCMAKE_CXX_COMPILER="/data/engsci-impact-eng-lab/engs2454/miniconda3/envs/py3_32/bin/i686-conda_cos6-linux-gnu-c++" /data/engsci-impact-eng-lab/engs2454/DEST-master_32/src/CMakeLists.txt
i686-conda_cos6-linux-gnu-cc and i686-conda_cos6-linux-gnu-c++ are the C and C++ wrappers for the Cray utilities and determined by the Miniconda py3_32 environment.
At this point you can run cmake .. to e.g. disable unnecessary solvers, then run cmake as usual to build the code (with updated path!)
cmake --build /data/engsci-impact-eng-lab/engs2454/DEST-master_32/src/BIN --clean-first --config Debug -- "-v"
Then check the executable file
file DEST_analyser_Debug
- For testing the executable file you can run the following:
./DEST_analyser_Debug -filename ../TESTS/B_013/B_013.dat
Method two
- Using a multilib version of GCC 11.2.0 which can produce 32bit binaries - to potentially save user using the conda environment. A recipe on 32bit DEST directory, as described below
module purge
module load CMake/3.21.1-GCCcore-11.2.0
module load Ninja/1.10.2-GCCcore-11.2.0
module load GCCcore/11.2.0-multilib
module load binutils/2.38
Enter your work directory (/data) and clone the DEST code into a folder, e.g. DEST-master
cd /data/engsci-impact-eng-lab/yours
git clone https://gitlab.DEST_master
- After the code is cloned, enter the DEST folder, make a build directory and enter it (or cd ../BIN)
cd DEST-master
cd src/BIN
From within the build directory, run the configure command (with updated path!). Note the use of CC and CXX to select the special ARC-specific compilers.
cmake -G "Ninja" -DCMAKE_BUILD_TYPE:STRING="Debug" -DCMAKE_INSTALL_PREFIX:PATH="/data/system/ouit0554/users/bronik/DEST-master_32/src/install" /data/system/ouit0554/users/bronik/DEST-master_32/src/CMakeLists.txt
At this point you can run cmake .. to e.g. disable unnecessary solvers, then run cmake as usual to build the code (with updated path!)
cmake --build /data/system/ouit0554/users/bronik/DEST-master_32/src --clean-first --config Debug -- "-v"
For testing the executable file you can run the following:
./DEST_analyser_Debug -filename ../TESTS/B_013/B_013.dat
DEST on Cloud Computing Platforms

DEST on Amazon Web Services (AWS)

After being successfully logged into the cluster, do the following:
1- First you have to check which AWS EC2 OS is used and if bit32 is supported
2- For Amazon Linux 2 you have to look what is provided as package ex: yum whatprovides /lib/ld-linux.so.2
3- You will get a list of all packages
4- Choose the right  and stable package (example: yum install glibc-2.26-60.amzn2.i686)
5- Test if is working
Custom Environments
Regardless of the existing python environment on the HPC/local system, you need to setup a custom Python environment including packages that are not in the central installation, the simplest approach here would be the installation of Miniconda locally in your own directories.
Installing Miniconda
First, you should download Miniconda (links to the various miniconda versions on the Miniconda website: https://docs.conda.io/en/latest/miniconda.html)
Note
If you wish to use Python on the ARC’s compute nodes then you must install Miniconda in your /work directories as these are the only ones visible on the compute nodes.
Once you have downloaded the installer, you can run it. For example:
user@login*:~> bash Miniconda3-latest-Linux-x86_64.sh
After you have installed Miniconda and setup your environment to access it, after that you can install whatever packages you wish using the conda install … command.
Then install CMake and create the following environment:
(base)user@login*:~>conda install -c conda-forge cxx-compiler
(base)user@login*:~>wget https://github.com/Kitware/CMake/releases/download/v3.20.0/cmake-3.20.0.tar.gz
(base)user@login*:~>tar -zxvf cmake-3.20.0.tar.gz
(base)user@login*:~>cd cmake-3.20.0
(base)user@login*:~>./bootstrap  --prefix=/home/ec2-user/CMAKE            (update this line with your install path)
(base)user@login*:~>gmake
(base)user@login*:~>make install
(base)user@login*:~> conda create -n py3_32
(base)user@login*:~> conda activate py3_32
(py3_32)user@login*:~> conda config --env --set subdir linux-32
(py3_32)user@login*:~> conda install python=3 gxx_linux-32
Enter your work directory (AWS —-> /data) and clone the DEST code into a folder, e.g. DEST-master
cd /data/yours
git clone https://gitlab.DEST_master
- After the code is cloned, enter the DEST folder, make a build directory and enter it (cd ../BIN)
cd DEST-master
cd src/BIN
From within the build directory, run the configure command (with updated path!). Note the use of CC and CXX to select the special ARC-specific compilers (py3_32 environment).
/home/ec2-user/CMAKE/bin/cmake -G "Ninja" -DCMAKE_BUILD_TYPE:STRING="Debug" -DCMAKE_INSTALL_PREFIX:PATH="/home/ec2-user/DEST-master/src/install" -DCMAKE_C_COMPILER="/home/ec2-user/miniconda3/envs/py3_32/bin/i686-conda_cos6-linux-gnu-cc" -DCMAKE_CXX_COMPILER="/home/ec2-user/miniconda3/envs/py3_32/bin/i686-conda_cos6-linux-gnu-c++" /home/ec2-user/DEST-master/src/CMakeLists.txt
Note
/home/ec2-user/CMAKE/bin/cmake needs to be replaced with your CMAKE installation directory.
i686-conda_cos6-linux-gnu-cc and i686-conda_cos6-linux-gnu-c++ are the C and C++ wrappers for the utilities and determined by the Miniconda py3_32 environment.
At this point you can run cmake .. to e.g. disable unnecessary solvers, then run cmake as usual to build the code (with updated path!)
/home/ec2-user/CMAKE/bin/cmake --build /home/ec2-user/DEST-master/src --clean-first --config Debug -- "-v"
Then check the executable file
file DEST_analyser_Debug
- For testing the executable file you can run the following:
./DEST_analyser_Debug -filename ../TESTS/B_013/B_013.dat
DEST on Local Machine
How to build and run on Windows
Installing Visual Studio
First, you should download and install your favorite desktop IDE packages (links to the various Visual Studio versions on the Visual Studio website: https://visualstudio.microsoft.com/free-developer-offers/)
Once you have downloaded the installer, you can run the installer.
Note
For more detailed approach visit https://visualstudio.microsoft.com/free-developer-offers/
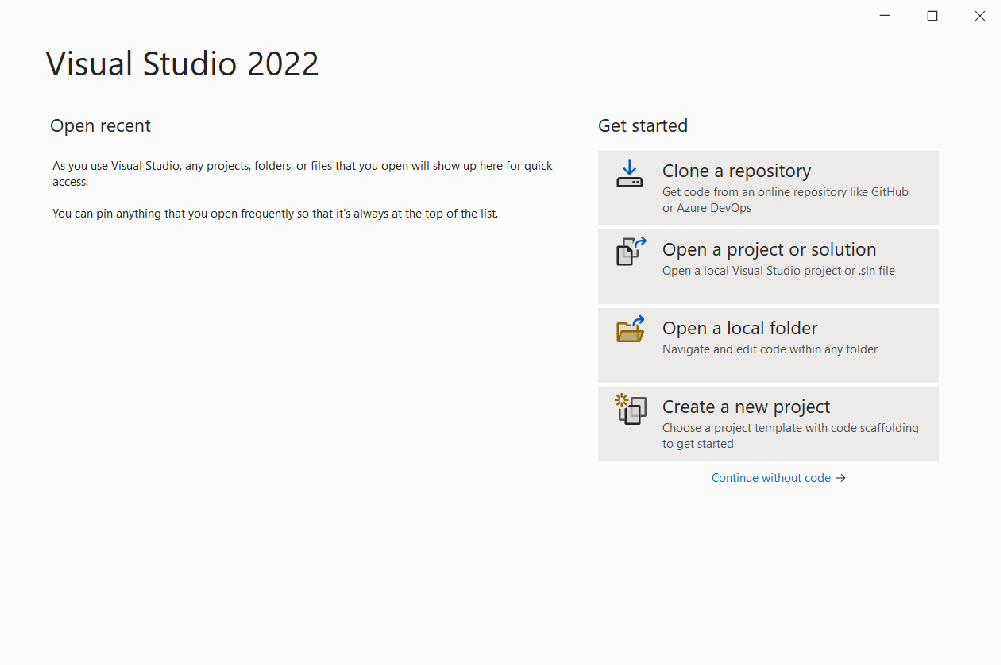
Start Visual Studio and select open a local folder and navigate to the root directory of your project (e.g. DEST-master):
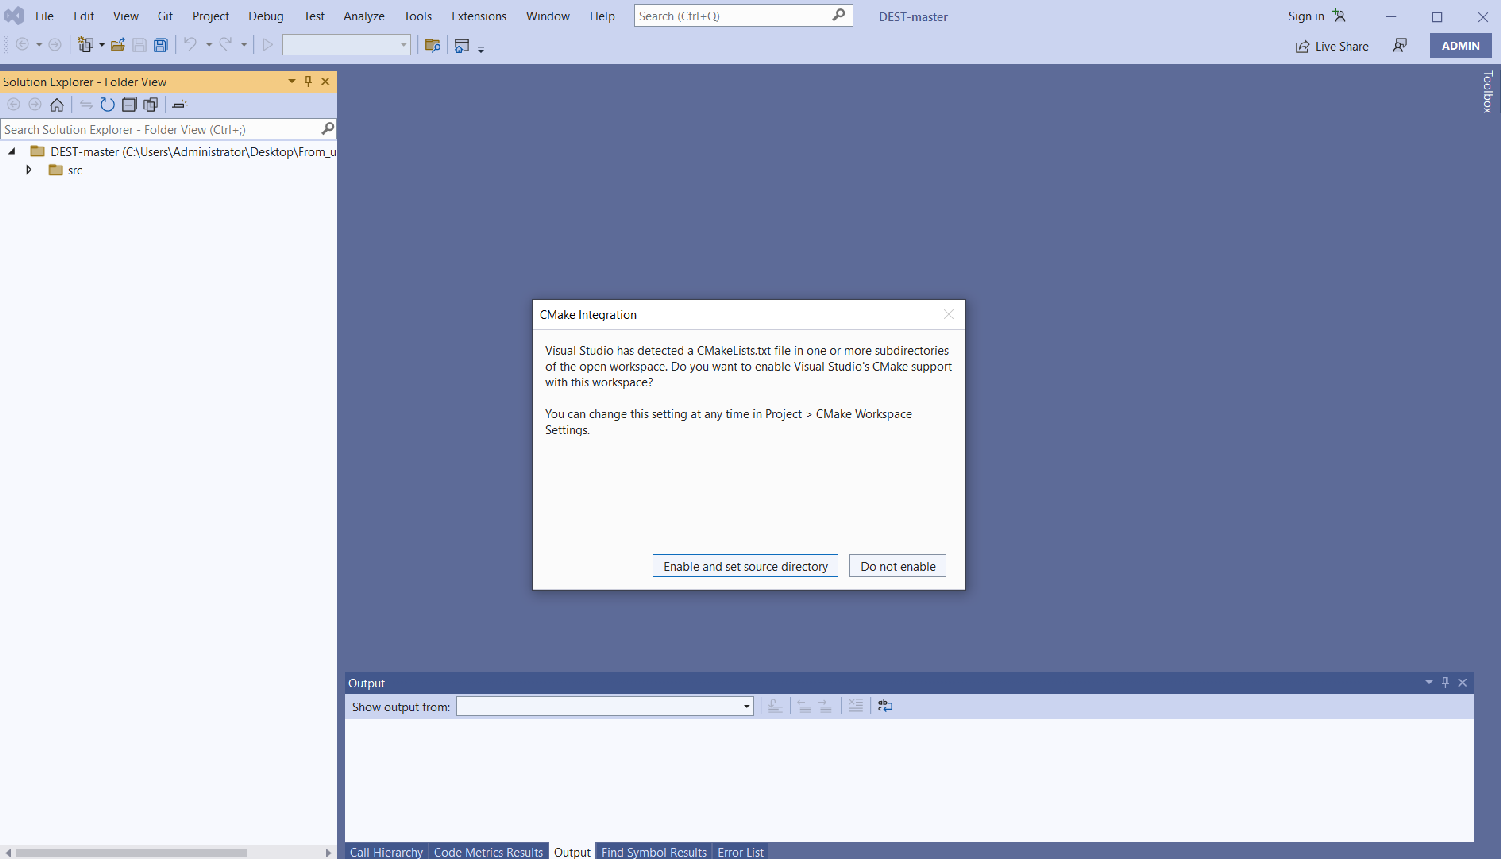
then click on Enable and set source directory
next select CMakeLists.txt (it can be found in DEST root directory)

After Visual Studio automatic compiling and Building done click on Manage configuration

then click on x86-Debug
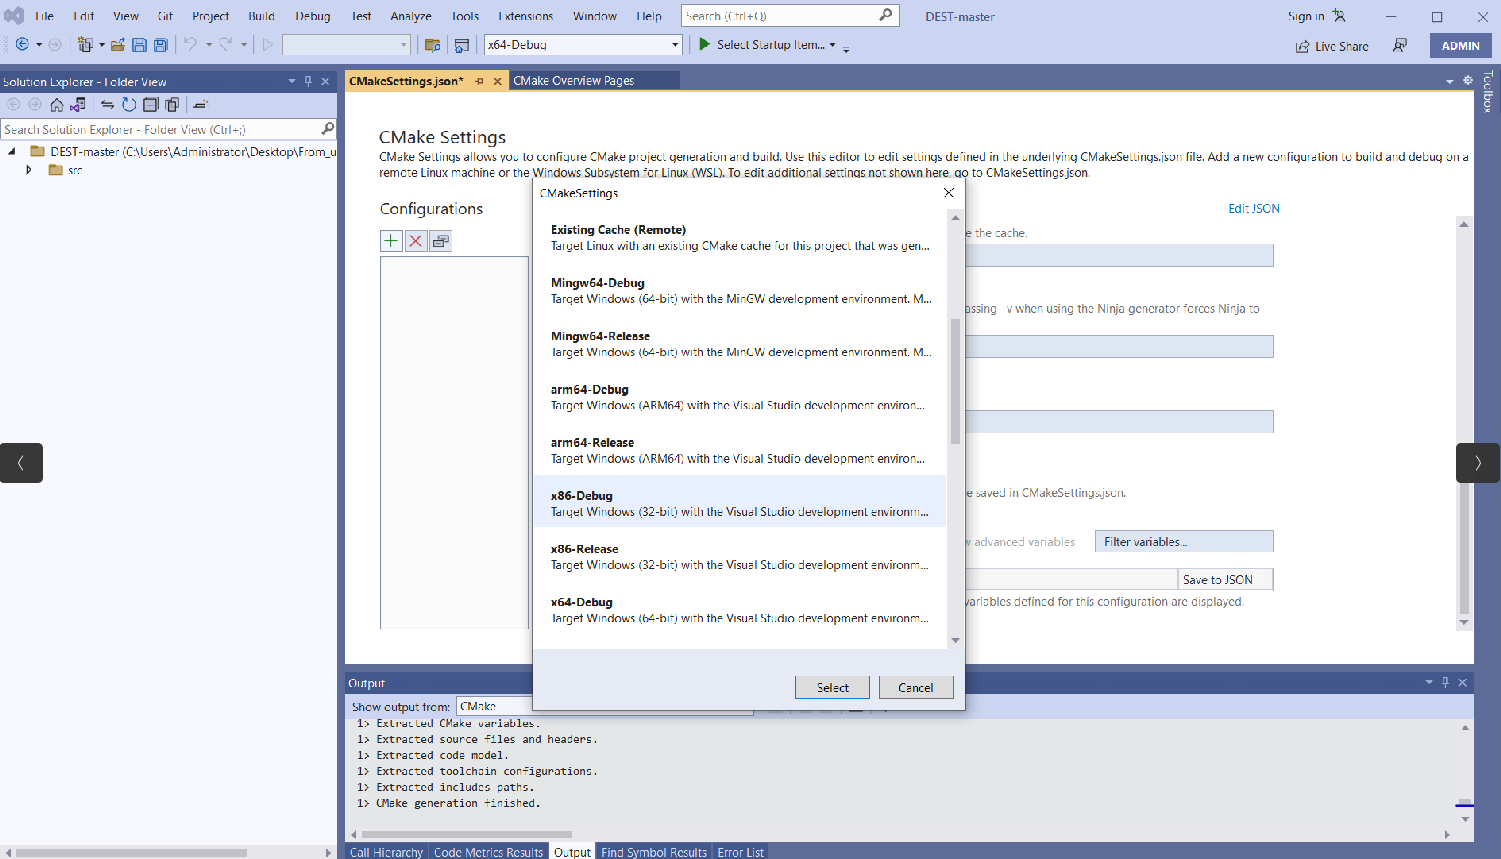
after saving Visual Studio automatic compiling and Building will be executed again
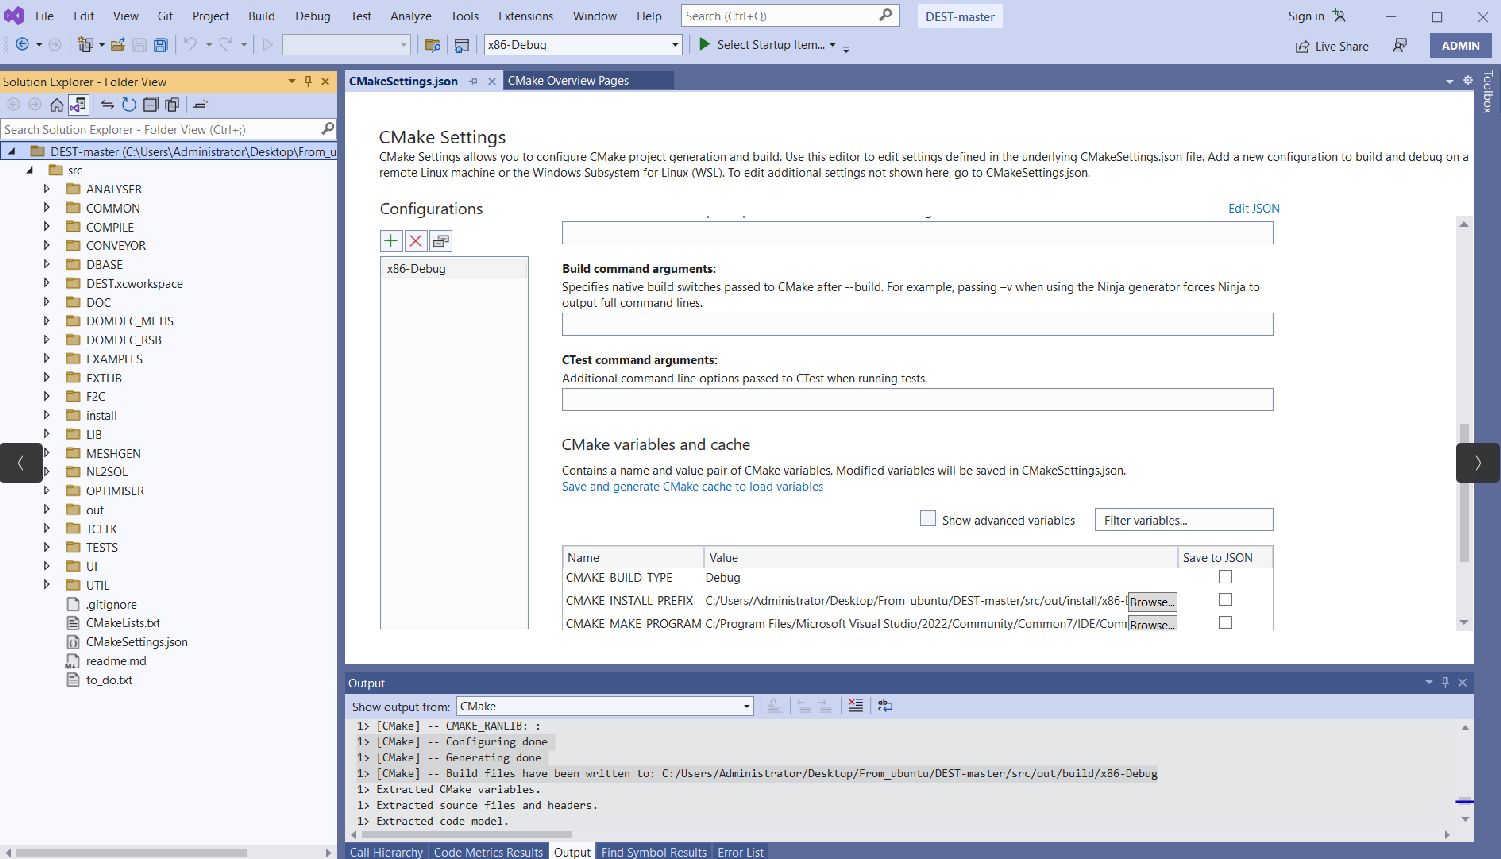
next click on Switch between solutions and available views
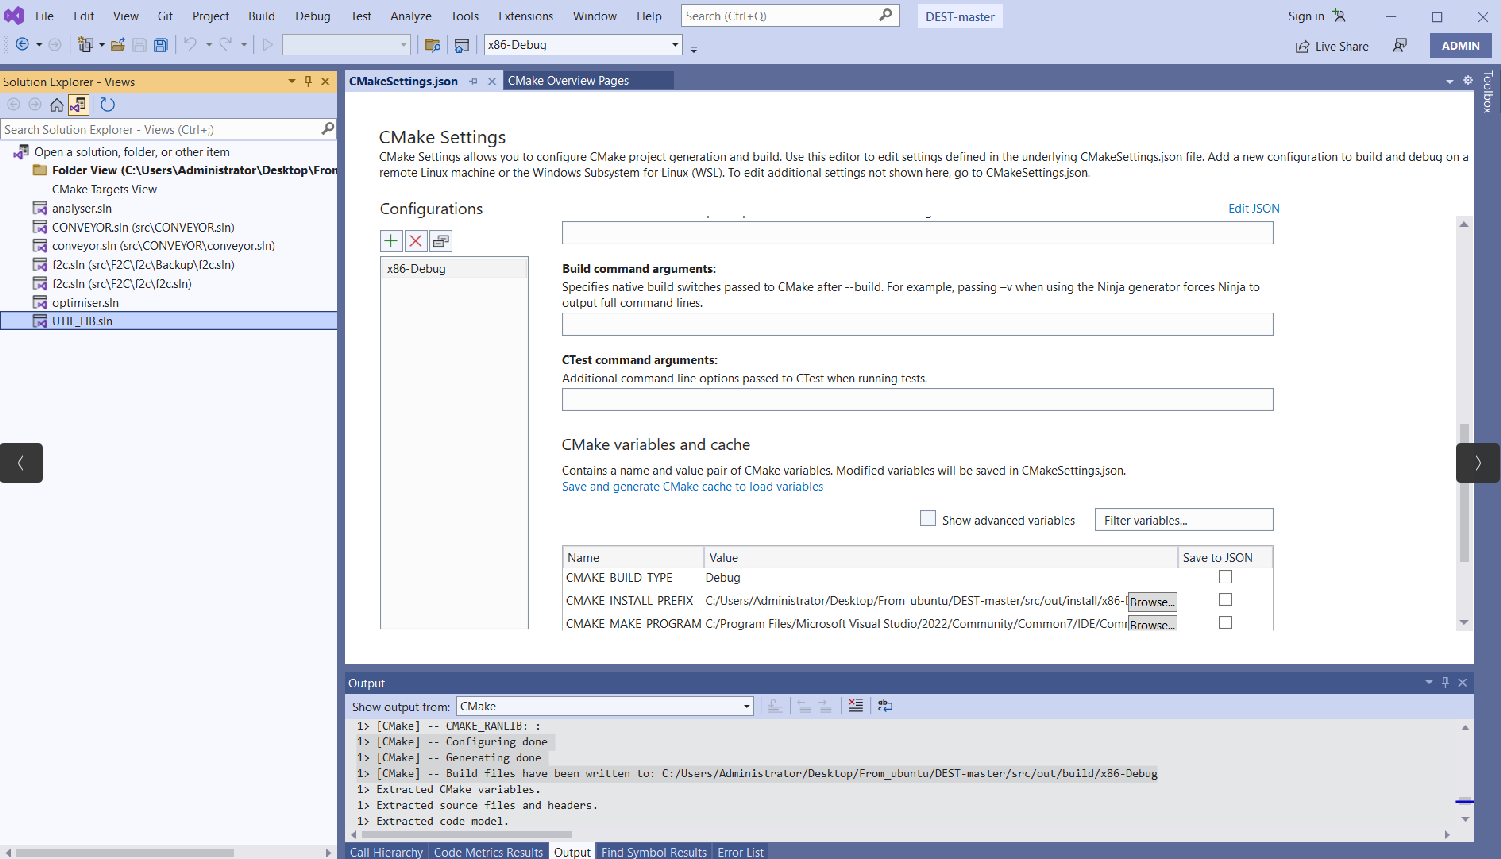
and then click on Cmake target view
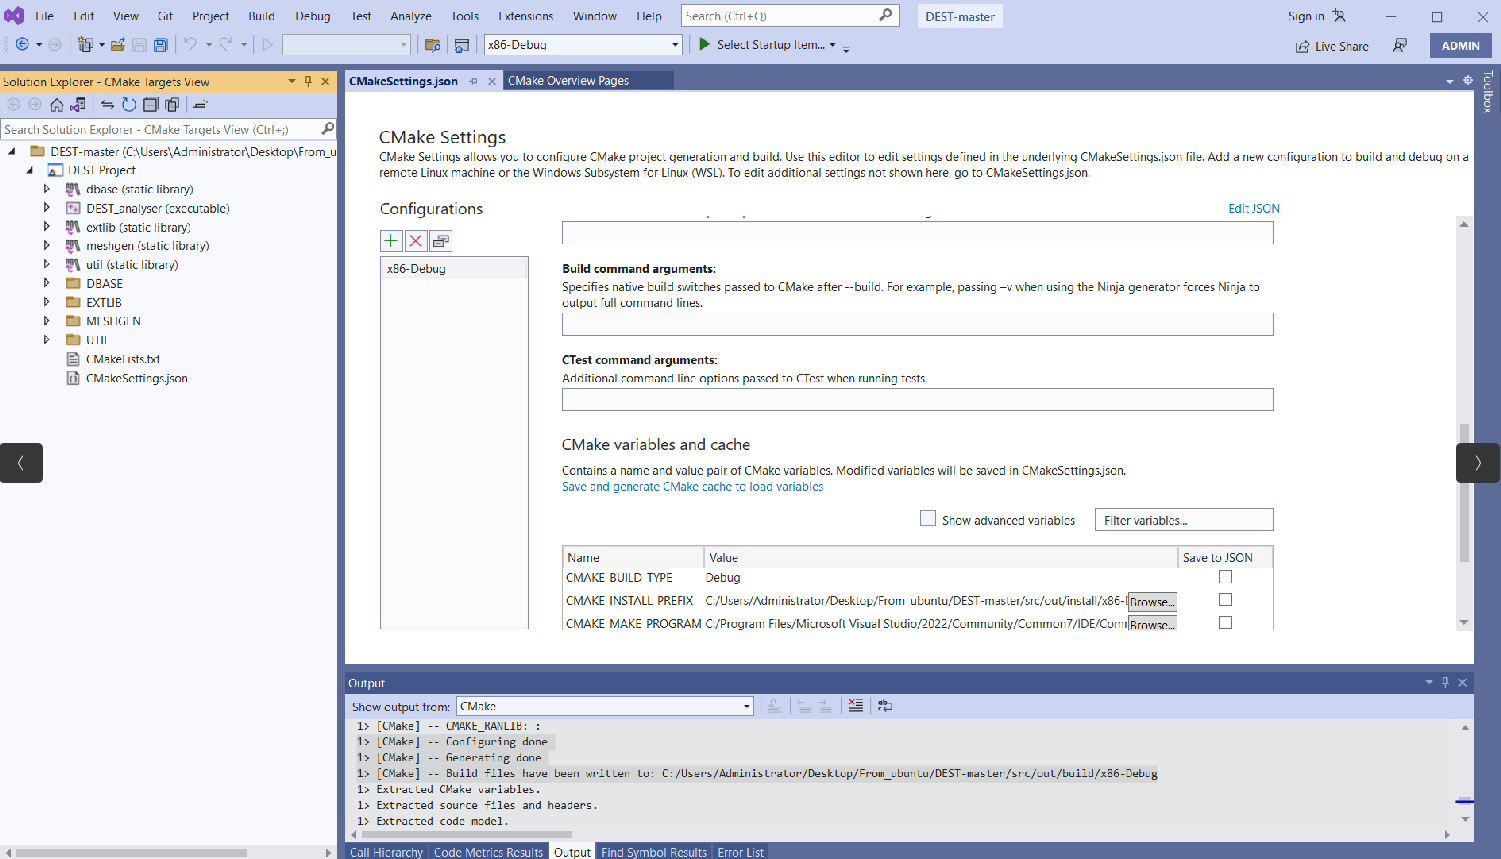
next click on startup items and select DEST_analyser_Debug
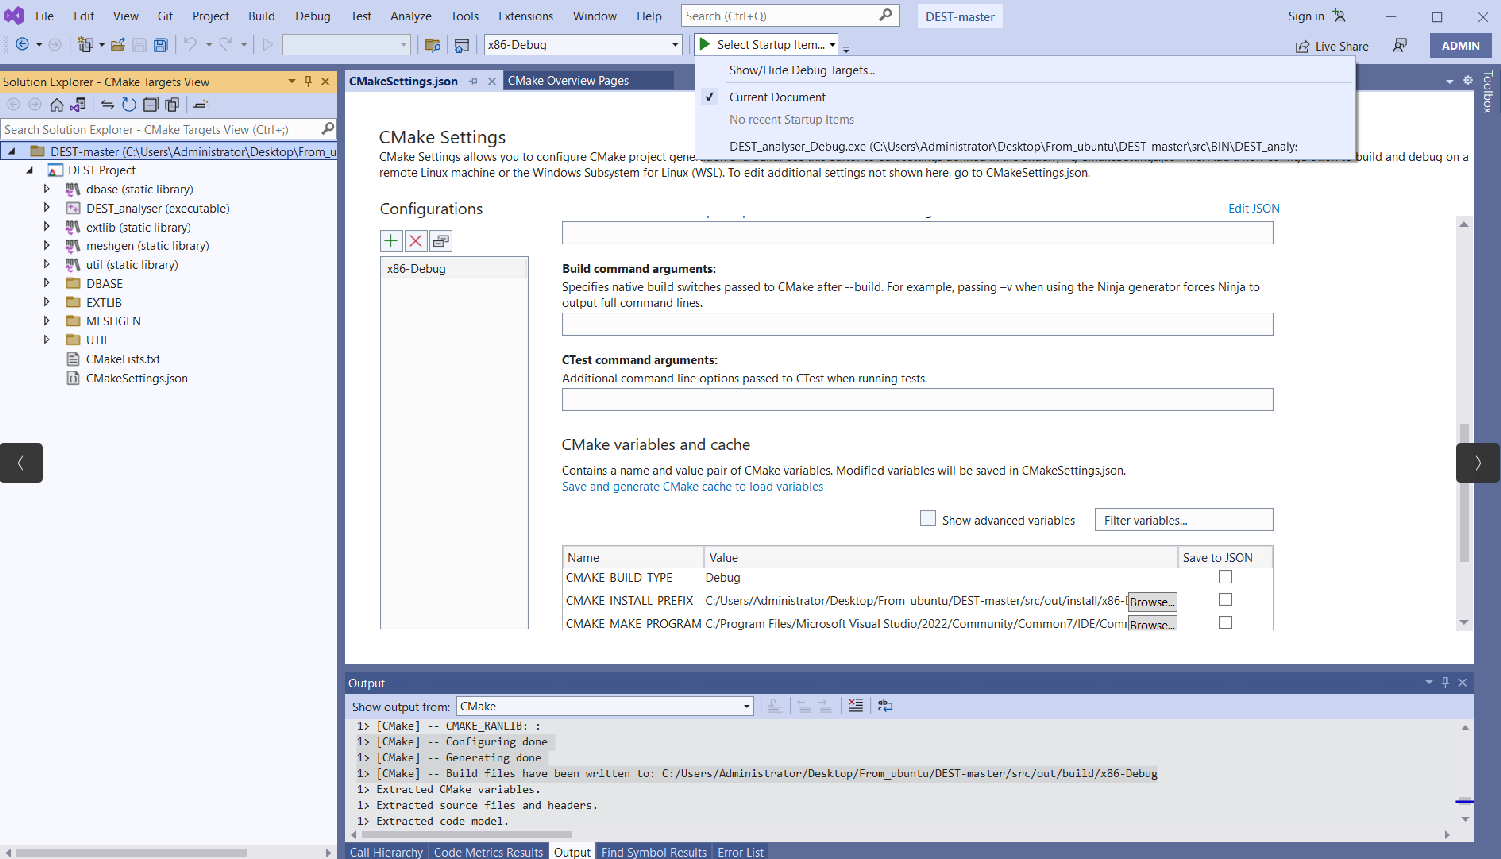
then right click on solution explorer (DEST_analyser) and select Add debug configuration
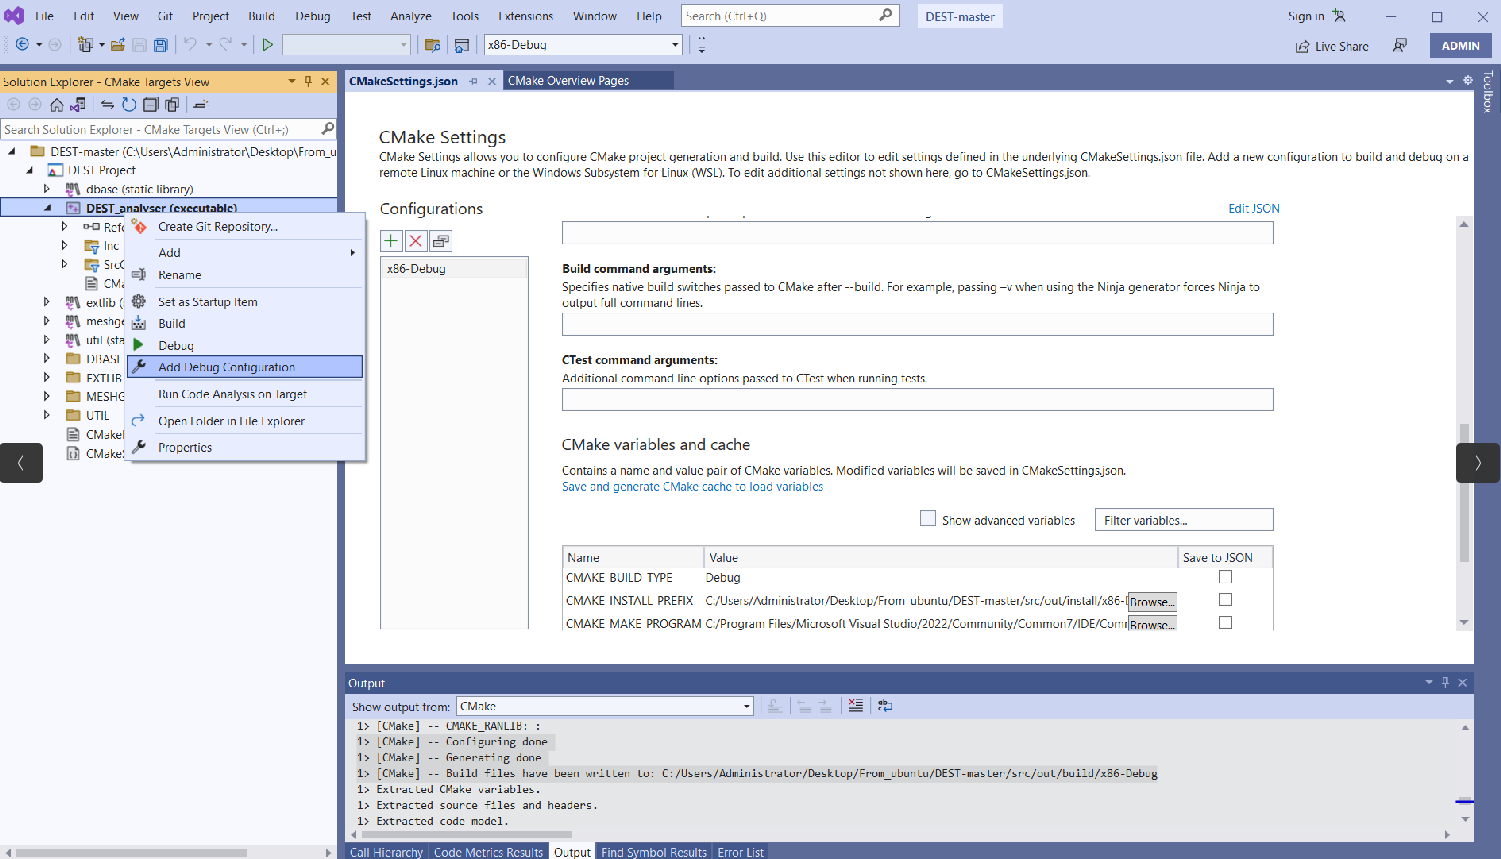
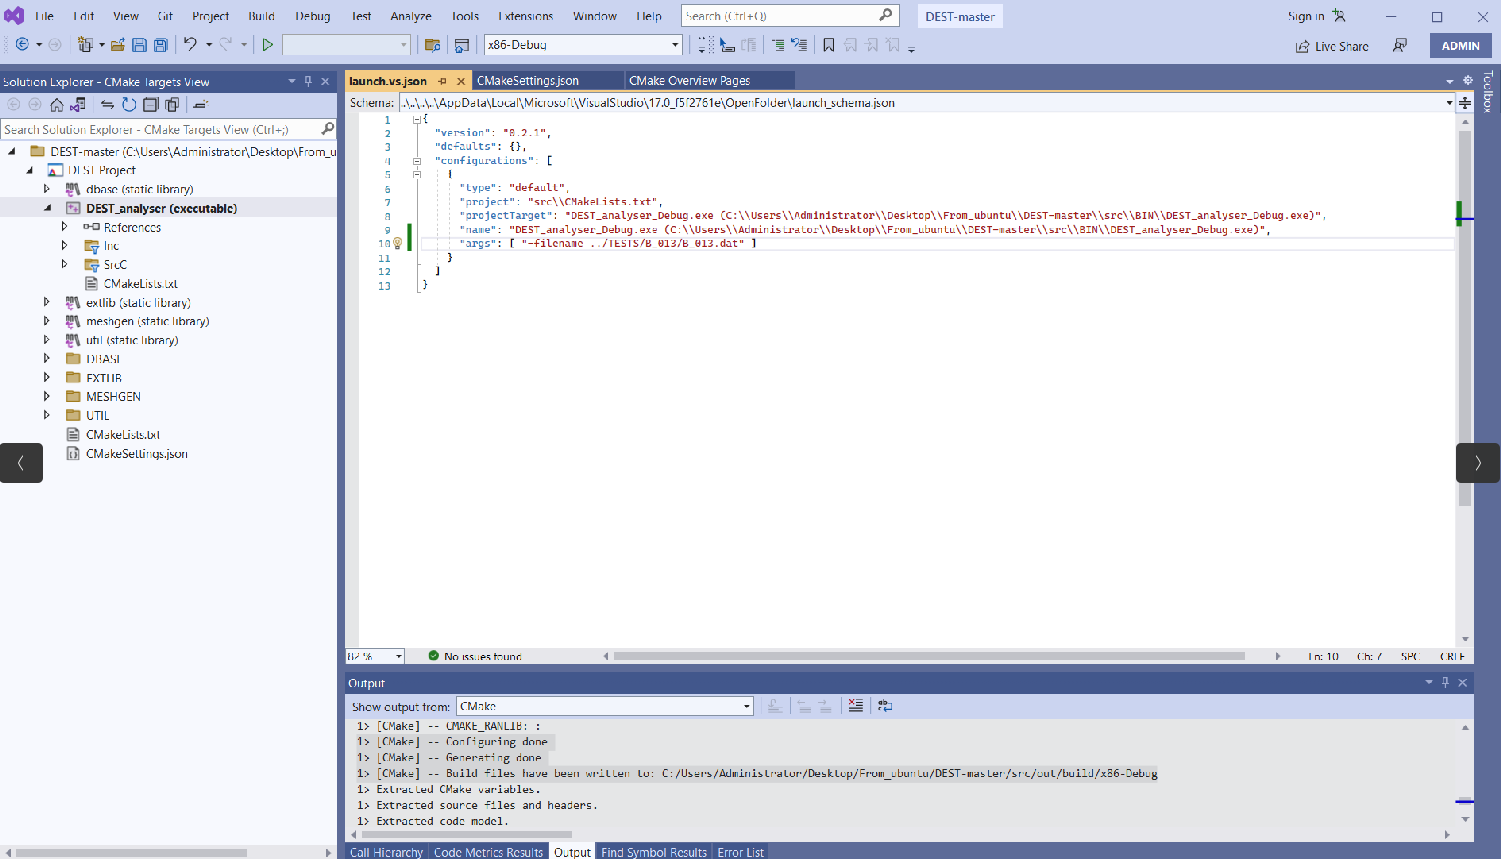
this will launch vs json file, add the following line to the file and save
"arg": [" -filename ../TESTS/B_013/B_013.dat"]
as shown in the following figure
next right click on solution explorer (DEST_analyser) and select Debug
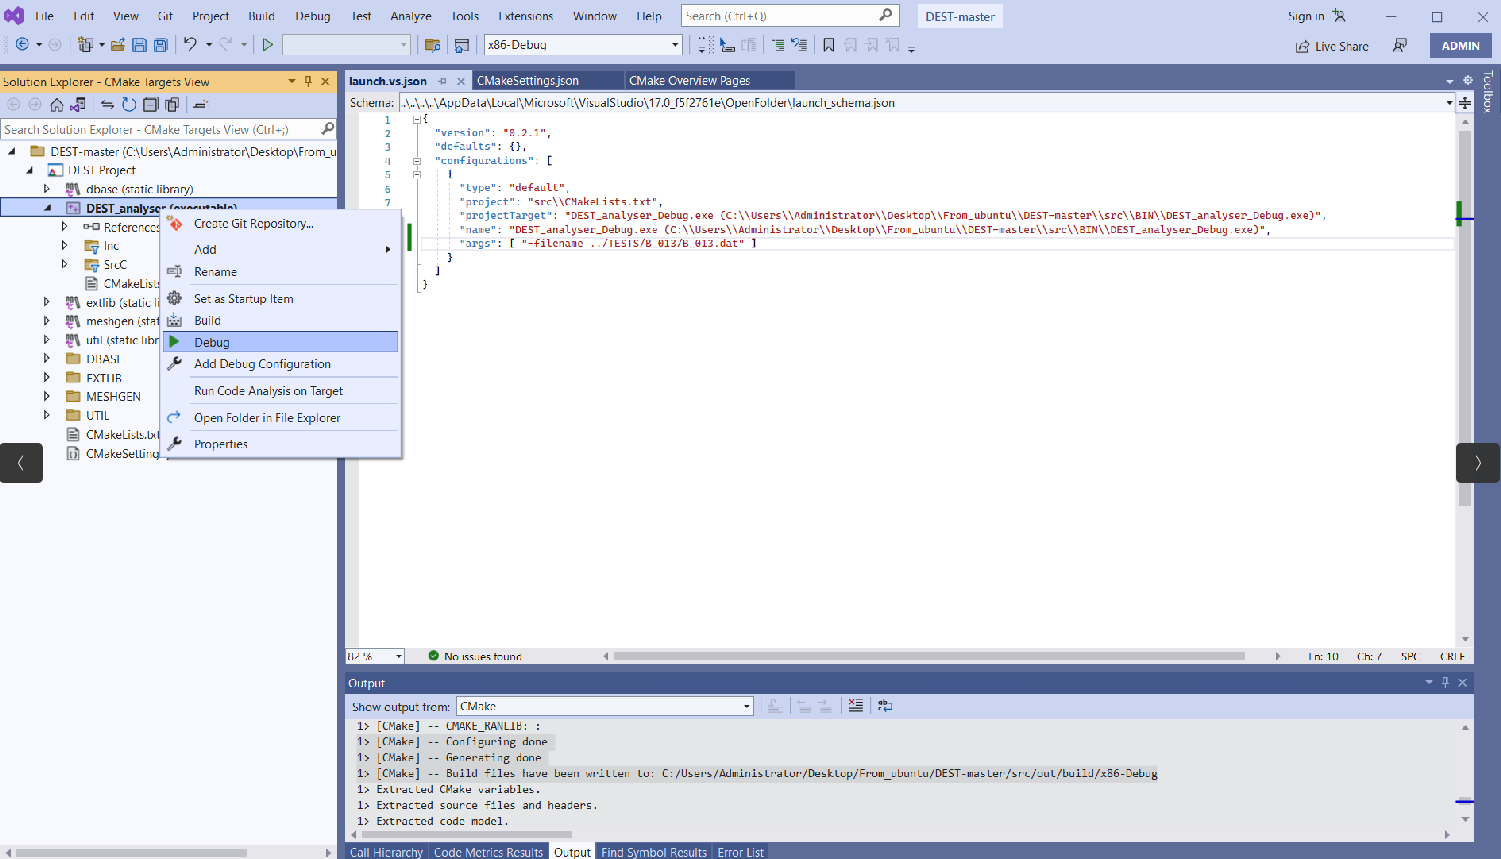
you will see the follwing (solver will start working ,,,)
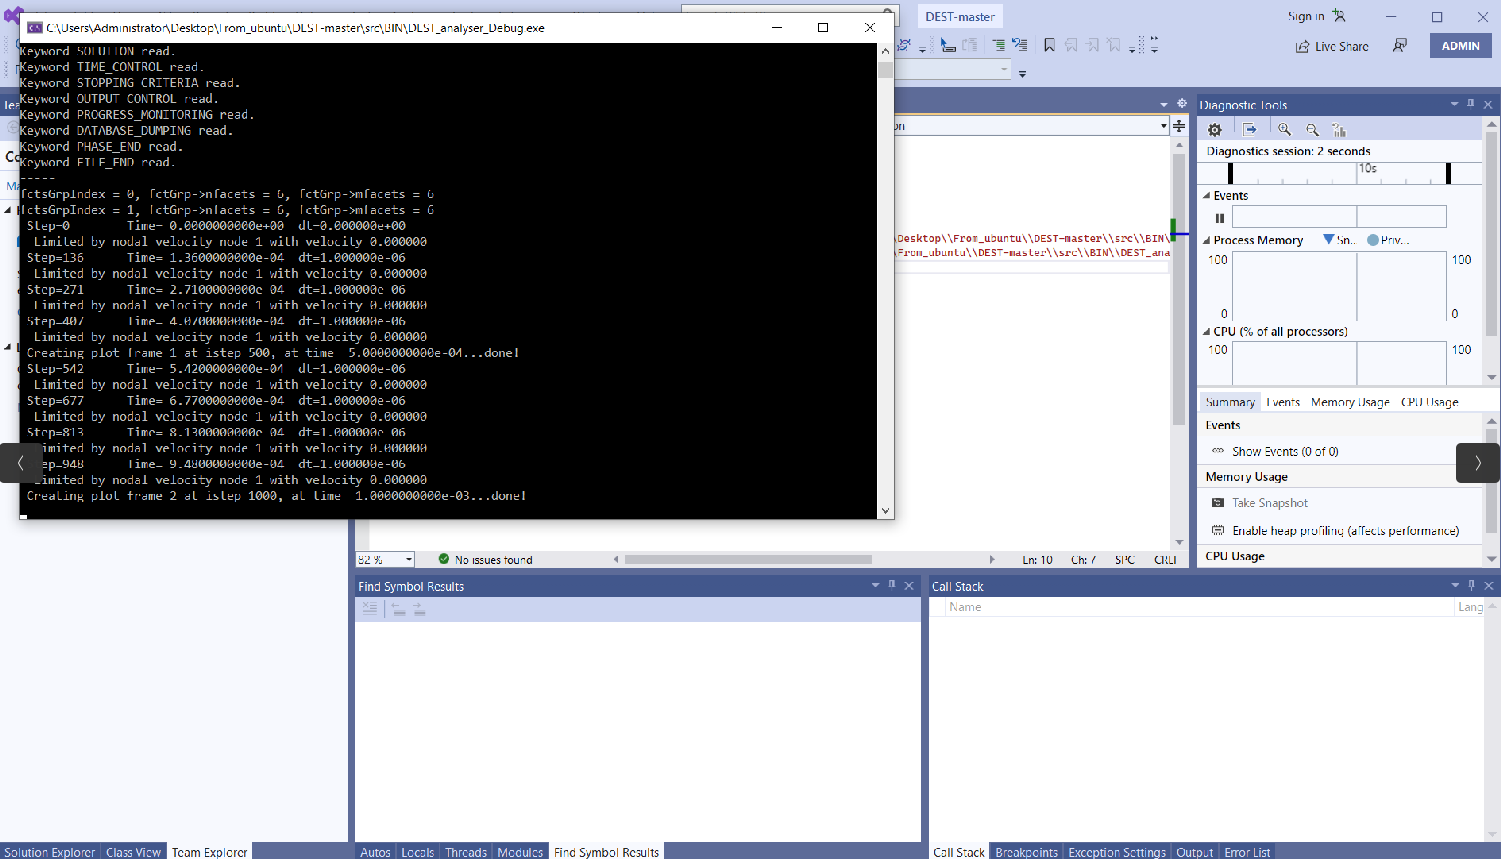
Using Windows command line the steps above are explained in the following
Enter the work directory (cloned DEST code into a folder, e.g. DEST-master)

From within the build directory, run the configure command. Note the use of CC and CXX to select the special compilers.

        "C:\WINDOWS\system32\cmd.exe" /c "%SYSTEMROOT%\System32\chcp.com 65001 >NUL && "C:\PROGRAM FILES\MICROSOFT VISUAL STUDIO\2022\COMMUNITY\COMMON7\IDE\COMMONEXTENSIONS\MICROSOFT\CMAKE\CMake\bin\cmake.exe"  -G "Ninja"  -DCMAKE_BUILD_TYPE:STRING="Debug" -DCMAKE_INSTALL_PREFIX:PATH="C:\Users\Administrator\Desktop\From_ubuntu\DEST-master\src\out\install\x86-Debug" -DCMAKE_C_COMPILER:FILEPATH="C:/Program Files/Microsoft Visual Studio/2022/Community/VC/Tools/MSVC/14.32.31326/bin/Hostx86/x86/cl.exe" -DCMAKE_CXX_COMPILER:FILEPATH="C:/Program Files/Microsoft Visual Studio/2022/Community/VC/Tools/MSVC/14.32.31326/bin/Hostx86/x86/cl.exe"  -DCMAKE_MAKE_PROGRAM="C:\PROGRAM FILES\MICROSOFT VISUAL STUDIO\2022\COMMUNITY\COMMON7\IDE\COMMONEXTENSIONS\MICROSOFT\CMAKE\Ninja\ninja.exe" "C:\Users\Administrator\Desktop\From_ubuntu\DEST-master\src" 2>&1"


where the Working directory will be e.g.

                C:\Users\Administrator\Desktop\From_ubuntu\DEST-master\src\out\build\x86-Debug


If everything is executed as expected you will see the following
               ...
               [CMake] -- Configuring done
               [CMake] -- Generating done
               [CMake] -- Build files have been written to: C:/Users/Administrator/Desktop/From_ubuntu/DEST-master/src/out/build/x86-Debug

[To build the code, linking the executable!]

Compiler: C:/Program Files/Microsoft Visual Studio/2022/Community/VC/Tools/MSVC/14.32.31326/bin/Hostx86/x86/cl.exe
Build flags: /DWIN32;/D_WINDOWS;/W3

The C compiler identification is MSVC, found in "C:/Users/Administrator/Desktop/From_ubuntu/DEST-master/src/out/build/x86-Debug/CMakeFiles   /3.22.22040401-MSVC_2/CompilerIdC/CMakeCCompilerId.exe"

Compiler: C:/Program Files/Microsoft Visual Studio/2022/Community/VC/Tools/MSVC/14.32.31326/bin/Hostx86/x86/cl.exe
Build flags: /DWIN32;/D_WINDOWS;/W3;/GR;/EHsc

Compilation of the CXX compiler identification source "CMakeCXXCompilerId.cpp" produced "CMakeCXXCompilerId.exe"

Compilation of the CXX compiler identification source "CMakeCXXCompilerId.cpp" produced "CMakeCXXCompilerId.obj"

The CXX compiler identification is MSVC, found in "C:/Users/Administrator/Desktop/From_ubuntu/DEST-master/src/out/build/x86-Debug/CMakeFiles/3.22.22040401-MSVC_2/CompilerIdCXX/CMakeCXXCompilerId.exe"

Detecting C compiler ABI info compiled with the following output:
Change Dir: C:/Users/Administrator/Desktop/From_ubuntu/DEST-master/src/out/build/x86-Debug/CMakeFiles/CMakeTmp

       Run Build Command(s):C:/Program Files/Microsoft Visual Studio/2022/Community/Common7/IDE/CommonExtensions/Microsoft/CMake/Ninja/ninja.exe cmTC_c4efc && [1/2] Building C object CMakeFiles\cmTC_c4efc.dir\CMakeCCompilerABI.c.obj

       [2/2] Linking C executable cmTC_c4efc.exe

       Detecting CXX compiler ABI info compiled with the following output:
       Change Dir: C:/Users/Administrator/Desktop/From_ubuntu/DEST-master/src/out/build/x86-Debug/CMakeFiles/CMakeTmp

       Run Build Command(s):C:/Program Files/Microsoft Visual Studio/2022/Community/Common7/IDE/CommonExtensions/Microsoft/CMake/Ninja/ninja.exe cmTC_2bd60 && [1/2] Building CXX object CMakeFiles\cmTC_2bd60.dir\CMakeCXXCompilerABI.cpp.obj

       [2/2] Linking CXX executable cmTC_2bd60.exe
For testing the executable file you can run the following (using Windows command line):
Note
You can close Visual Studio IDE and continue with Windows command line
cd path to DEST_analyser_Debug.exe (e.g. src/BIN/DEST_analyser_Debug.exe)
DEST_analyser_Debug.exe   -filename ../TESTS/B_013/B_013.dat
as shown in the following figure

congratulations, you have now built and run DEST using Windows command line and Visual Studio.
How to build and run on macOS
Xcode 9.4.1 and the macOS 10.13 SDK are the last versions capable of building 32-bit Intel (i386) binaries, thus you would need either Xcode 9.4.1 or earlier version or a hack allowing the use of Xcode 9’s toolchain on macOS Catalina, Big Sur, and Monterey.
Note
For more detailed approach visit https://github.com/mrpippy/XcodeNueve
First you need to install Mac Ports:
sudo xcode-select --install   [if you have already installed Xcode 9.4.1 you need to skip this step]
sudo xcodebuild -license
Install latest dmg package from http://www.macports.org/
Install latest XQuartz package from http://www.xquartz.org/
set in .bashrc: export PATH=/opt/local/bin:/opt/local/sbin:$PATH
next you need to install the following:
sudo port install llvm-11
sudo port install clang-9.0
Enter your work directory and clone the DEST code into a folder, e.g. DEST-master
cd /data/yours
git clone https://gitlab.DEST_master
After the code is cloned, enter the DEST folder, make a build directory and enter it (cd ../BIN)
cd DEST-master
cd src/BIN
Before compiling and Building you need to modify the following lines in DEST root/CMakeLists.txt
if (${APPLE})
       set (CMAKE_C_COMPILER "/opt/local/libexec/llvm-9.0/bin/clang")
       set (CMAKE_CXX_COMPILER "/opt/local/libexec/llvm-9.0/bin/clang++")
endif ()
From within the build directory(BIN), run the configure command (with updated path!). Note the use of CC and CXX to select the special compilers.
cmake -G "Ninja" -DCMAKE_BUILD_TYPE:STRING="Debug" -DCMAKE_INSTALL_PREFIX:PATH="/Users/kevinbronik/Desktop/out/install/Linux-GCC-Debug" -DCMAKE_C_COMPILER="/opt/local/libexec/llvm-9.0/bin/clang" -DCMAKE_CXX_COMPILER="/opt/local/libexec/llvm-9.0/bin/clang++" /Users/kevinbronik/Desktop/src/CMakeLists.txt
At this point you can run cmake .. to e.g. disable unnecessary solvers, then run cmake as usual to build the code (with updated path!)
cmake --build /Users/kevinbronik/Desktop/src --clean-first --config Debug -- "-v"
Then check the executable file
file DEST_analyser_Debug
- For testing the executable file you can run the following:
./DEST_analyser_Debug -filename ../TESTS/B_013/B_013.dat
How to build and run on Linux
First you need to install CMake (if it is not already installed!)
 wget https://github.com/Kitware/CMake/releases/download/v3.20.0/cmake-3.20.0.tar.gz
 tar -zxvf cmake-3.20.0.tar.gz
 cd cmake-3.20.0
./bootstrap
 sudo make install
 cmake --version
next you would need to install ninja, gcc-multilib and g++-multilib
sudo apt install ninja-build
sudo apt install gcc-multilib g++-multilib
Enter your work directory and clone the DEST code into a folder, e.g. DEST-master
cd /data/yours
git clone https://gitlab.DEST_master
After the code is cloned, enter the DEST folder, make a build directory and enter it (cd ../BIN)
cd DEST-master
cd src/BIN
From within the build directory(BIN), run the configure command (with updated path!). Note the use of CC and CXX to select the special compilers.
cmake -G "Ninja" -DCMAKE_BUILD_TYPE:STRING="Debug" -DCMAKE_INSTALL_PREFIX:PATH="/home/kevinb/Documents/DEST-master/src/install" -DCMAKE_C_COMPILER="/usr/bin/cc" -DCMAKE_CXX_COMPILER="/usr/bin/c++" /home/kevinb/Documents/DEST-master/src/CMakeLists.txt
At this point you can run cmake .. to e.g. disable unnecessary solvers, then run cmake as usual to build the code (with updated path!)
cmake --build /home/kevinb/Documents/DEST-master/src --clean-first --config Debug -- "-v"
Then check the executable file
file DEST_analyser_Debug
- For testing the executable file you can run the following:
./DEST_analyser_Debug -filename ../TESTS/B_013/B_013.dat